Major Project - Research and Reflection on Trimming the Fat

One of the things I had to look at and was a big part of the editing process, was trimming the fat after having a fine cut. Trimming the fat is basically cutting out the unnecessary stuff that bring nothing to your movie and those small frames or seconds that just slow down the pace of a scene. The main reason for working a lot on this, was due to advice from Tim, an editor that was brought in to watch the films and give feedback and later from Simon. This was really important and good because there were a lot of bits that were really bringing nothing to the show anymore. It all started with having our video as a 29 minutes piece with no closing credits, being a problem since we needed to keep it no more than 28-29 minutes as it is a Pilot episode. The other reason was because there were scenes that were not really working as much on screen as they worked on the script and we needed a bit of guidance on what to do with them. At this point is where the fun began on understanding what was really unnecessary and what wasn't. It was interesting to have at this stage two different points of view on trimming the fat, both from Tim and Simon, because Tim was looking more on the film as an editor and how the images and sound flowed properly, where Simon was looking more into it from the storytelling point of view. This was quite helpful because I started to get a bit more of a sense of what wasn't working in the film in general from different aspects of it. Apart from their input I made a brief research into it and found something interesting that I wanted to share.


Andrea Allen, a staff member of Vimeo, who is also a Director, Producer and Editor, explained quite nicely the process and importance of trimming the fat with a nice example added to it as well:

If you’re shooting a scene for a film or maybe just taking footage of someone performing a simple action, it’s always a good practice to shoot more than you think you’ll need. This method gives you plenty of footage to pick from when it comes time to editing your video and putting it all together. However, with so much footage to choose from, you have to learn what shots are the most important to convey the action of the scene. In essence, you need to learn how to trim the fat.

Take a look at this exercise we did to illustrate the effects of cutting extra shots while still creating the same result — and actually a more-succinct scene.

Here’s a video of me getting coffee. Not the most cinematic of scenes, I know, but it’s a good mundane action that allows us to prove a few points. First, we overshot the scene and came away with WAY too much footage. Then, we made two edits: one overly long, drawn out and completely ridiculous scene, and one short, sweet, and succinct scene. Here’s the first. Pay attention to the pace and flow. Do you see anything that seems superflous? Are all these shots necessary? Does the viewer need to see all this stuff?

https://vimeo.com/blog/post/trimming-the-fat


I am not gonna lie, but this is a great example of the things I had to do exactly! For my final cut before starting to trim the fat, I had a look at things like:

- Unnecessary Shots
- Length of the Video
- Execution of Story
- How to Quicken the Pace

This were very key elements when it came down to making some really long dragging scenes, into something more compact but actually working.

Simon mentioned something that was quite helpful, which was that going from 29 minutes of a 30 page script, down to 24 minutes as an example, was fine and was achievable. The fact that the script implies one minute per page making it around 30 min show, doesn't mean that we have to stick to that, because there are things that don't need be shown and the audience can imply. I give an example of a book I was recently reading called "Unlimited Star Wars" where it quotes:


"If you're familiar with Ric OliƩ, the sand aqua monster, Slave I, Varykino, IG-88, Lobot and Ewoks, you must be a fan of Star Wars. But if you recognize any of those names, thats remarkable because non are mentioned in the Star Wars movies themselves, so you must have gained that knowledge elsewhere, possibly from toy packages, comics, books or pure osmosis"


The reason I quote this is because it is very interesting how even some big major films, there are elements and characters that are never mentioned, but we constantly see them. For example: Slave I is Jango Fett's airship which we see in a big scene where Obi-Wan is being chased from him al the way from Kamino to Mustafar. And the Ewoks, which are small creatures that live in the City of Clouds that look like mini Chewbaccas (Appreciated at the end of Episode IV).

There are many other cases with lots of other movies and shows where they confuse their audience and it is because you can't give all the information to the audience and not just only so they can think for themselves, but because its obvious stuff and people can easily assume that if one person is in one place and suddenly in another, they have moved there, they have exit a room and entered another, that can be implied. The SHORT version of that Coffee example, is very well done in the sense that is very similar to what I did which was looking at things like:

- Pace of Video
- Clarity of Story
- Transitional Shots
- Action that isn't Shown, but still Understood

All of this has helped so much and I understood that bringing that film from 29 minutes to 21 which is what it is at this moment, is a massive step, instead of taking elements of the story and just shortening it, it actually brings more to it, things are more clear, easier to understand and it flows, it gives people time to understand and enjoy the story and also a break to enjoy jokes and funny parts. I think that this was probably the biggest thing done during the whole editing process and I can say I am very happy with it as it has solved a lot of things that instead of helping me bring more to the film, was actually taking from it. 


Major Project - Problems with the Multicam Shoot (Research and Reflection)

One the things from which I learnt the most, that sadly didn't go as planned, was the multi-cam shoot. Originally based on the preproduction work that was done, the idea of a multi-cam shoot was considered and it was meant to be quite helpful when it came down to filming at the football pitch. The idea originally was to get as much coverage and footage as possible form different angles without me having to keep moving constantly, which was going to become a but of a waste of time. At this point the idea was to use more than one camera, at least two of them, in order to do as much coverage as possible. For this setup, we booked out 2 Sony EXs and a Canon 7D, which was going to become the backup more than anything. The first problem that we encountered was that the batteries died quite quickly and we didn't have anywhere to charge them in all those hours we were filming on the pitch, forcing me to use the batteries from the other Sony. This was part of who the problem started, but I will explain it a bit more in detail with the research I made and what worked and what didn't from it.


While doing my research about multi-cam shoots, I came across with 3 main things by Noam Kroll, video producer and blogger, that needed to be evaluated and taken into account as part of the most important elements of this technique. 


The first thing was:

Camera Placement

If you want to achieve professional level results with your shoot, you need to make sure that you are optimizing your coverage. In other words, if you are shooting a scene with two actors and you have 3 cameras on them – you probably want a close up on each actor, and then a wide/medium master shot. This may sound obvious, but you probably wouldn’t believe some of the poorly executed camera placements that I’ve seen over the years. For instance, in a situation like the example above, I have seen setups where the director wanted all three cameras roaming (as opposed to locked off on each of the different actors) and ultimately it defeated the purpose of shooting with a 3 camera setup. As you might imagine, when it got time to edit the scene it was extremely difficult for the filmmakers to cut together all three angles as they often were too similar looking to intercut. This doesn’t mean you can’t get creative with your multicam setups, but rather that you make sure you are never doubling up on coverage, regardless of the creative choices that are made. 

In our case, we tried to cover different angles by having Sam Babington, the other cameraman, pointing to another angle in which he was going to get something that I wasn't getting. It was hard sometimes because if something important was happening, we were both trying to get it just from another angle, which worked in a way but sometimes not as much. The biggest issue that we had with this in particular was during the shooting of scene 19,  where the main cast had an encounter with the Strood FC lads, I was filming the 4 main boys while Sam was filming the Strood ones. For some reason, after he shoot when we were reviewing his shots on the computer, they all came across very shaky, blurry, too many zooming in an out and the majority of that footage was unusable. It was quite bad because I only got with my camera the 4 main guys, meaning that I had a really hard time editing that bit due to having almost no footage usable for the other part. This is something I learned on, which is not to trust 100% anyone filming something when I am the cinematographer because it can screw thing ups for one reason or the other. Sadly the director and I reviewed the majority of his footage and it is all the same, which is one of the reason the multi-cam shoot didn't work that well. 


The second element was:

Lighting

The easiest way to get the look that you’re after while maintaining visual consistency is by setting up your lights much in the same way that a stage play or a sitcom is set up. To clarify – I’m not suggesting that you make creative choices that will make your final product look like a play or sitcom, but rather that you make rigging and logistical choices in that same way. For example, lighting from above (by rigging lights to a ceiling or grid) would be hugely preferable over lighting using traditional stands. The reason of course being that when rigged to the ceiling, the lights are completely out of the way and you can shoot in nearly any direction that you want. Lighting your set this way will inevitably take more time up front – so be prepared for some extra time pre-lighting, but in the end it will completely balance out as you will save loads of time once you start rolling.

Although we didn't deal directly with proper lighting kit for this multi-cam shoot, we had to deal a lot with the sunlight which was actually very annoying. The problem with this was that as the light changes we were meant to be constantly changing the settings of the camera and such in order to make it look as similar as all the other shots. A lot of them sadly don't look any similar on the Sony and the Canon because it was way harder to keep up the same settings when the light kept changing. This wasn't easy and it has given me a lot of work in color correction, but I believe that it wasn't that bad and there is definitely some clips I can work with.

The third and last was:

Matching Cameras

Amongst the most common and problematic issue that arises on multicam setups (particularly on low budget indie films) are mismatched cameras. In many instances, small productions don’t want to rent two or three identical cameras, so they mix and match various cameras that they have access to in order to supplement their multicamera setup. While this can be done and in some circumstances you can get away with it, I would highly advise against mixing cameras whenever possible. In an ideal world, you want every camera to be the exact make and model, or at the very least the same brand. Even if you are shooting on identical cameras, you still need to be extremely diligent when it comes to your settings (camera profiles, shutter angle, white balance, etc.) as any slight difference in your camera settings can cause some big headaches in post

This was probably one of the biggest issues regarding the footage itself. Sadly the fact that the batteries on the Sony EX became an issue, we had to change the second Sony for the Canon which of course made things harder when it came down to matching the clips as much as possible. In the past I had managed to make it look very similar during my Digital News unit, but it was harder here when two different people were operating them for hours of constantly filming non stop and time limit. I wish that some things had worked out better and that this technique became more of an ally than an enemy, but I think this kind of experiences is where you learn from to avoid things in a future and although I have managed to fix some things, I have had a tough time during the edit with footage that is unusable from the Canon.


Canon Footage

Sony EX Footage 


Major Project - Filming in a Car (Gear, Audio and Techniques)

Filming in a car in general can become very tricky if you don't know what you are doing, specially when it involves a lot of dialogue, a lot of people and people coming in and out of the car. In our film we have 3 car scenes, one with the four main characters and the other 2 with just 2 of them. For each of them I required to use a bit of a different technique, because the way the scene developed, forced me into making things a bit different and more interesting for the viewer. I worked with two main camera units, the Sony EX and a Go Pro Hero 4 Black. Before going into the shooting, I did a little bit of research regarding filming in a car and although the majority of tips and techniques are based for MOVING cars, which wasn't our case, some of them gave me ideas or made my head a bit more clear in what I needed to look at in order to make those shots work. I had to work a lot with my director and the sound guy because there were occasions in which I was inside the car without being able to listen to any of them, which made those scenes an ever bigger trusting circle. I will be talking about how I embraced those situations and the things that worked and didn't.


The first thing I did was to look at some videos that showed some techniques on how to film on a car. A lot of them talk about moving cars and some about filming the exterior of a car, which is not the case with us, but they were still great info for any future shoots that involve a car. Here are some of the videos that I had a look at, followed by a brief explanation about them:


Since at least half of the information on this videos was not useful for our shoot, I will be explaining what I got from them and how I implemented those techniques into our scenes. On the first video there are some really advices on where to place the camera in order to tell the mood of someone. Having a camera from the wind mirror looking inside the car where you only see the driver, can become a shot of someone thinking, is a very private shot as you are seeing from outside what is happening on the inside which doesn't just apply literally to the inside and outside of the car, but also to the inside of this characters mind and facial expressions seen from an outer point of view. Being inside or outside the car can send a message without saying a word and that is something I personally didn't know about. I implemented this style on the car scene in which Nath and Tom are arriving to the boxing place, where Nath sees what looks like a drug dealer sitting next to where they parked. The fact that I showed this from the inside, as a POV with the window up, shows safety and that personal shield that people tend to have in front of them in some situations. I never showed Tom looking through that window at the drug dealer, because instead of having a shy and 'innocent' personality like Nathan, he is more of a strong character, meaning that he makes Nathan a bit more confident that nothing is going to happen, hence the reason I don't show that window anymore after that. This might sound a bit complicated, but it is something that I learned about telling a story through a shot and in this case using the elements of a car. 


The second video is about the GoPro, which became an usual when it came down to shooting the car scenes. Wether we thought we needed them or not, I decided to record all the scenes with them, which actually expanded my possibilities quite a lot. I had never used a GoPro on a car before or even on the suction mount like explained on the video, but I believe it was a good tool. The idea behind this was to get a clear shot from the inside of the car where we could see all the characters, meaning that this shot was going to become our wide shot where I was going to cut to as a safe shot. In order to make this work properly I had to play around with it first, because the first question that popped in everyones head was, how are going to see what the GoPro is recording if it doesn't have a screen? In order to fix this issue I had to download the GoPro app on my iPad Pro, which I took to the set to make it the screen that we needed to have. Although there a bit of a delay between the live of the camera and the Wi-Fi stream to the iPad, it was clearly visible and worked out pretty well. Here are some images of how it looked and what the screen looked like:

GoPro Footage

iPad Pro Live Stream 

Sunday league crew monitoring the GoPro

One of the issues that I had with this, which at the moment I didn't take into consideration, was that the the audio and video started going out of sync on my computer during the time of editing. At first I wasn't sure of what it was and I thought it was just the wrong audio track, but it was the right one. I finally realized that the problem was that the GoPro records in 30fps and the audio we were recording from clip mics attached to the Sony EX, which was recording in 25fps. I believe this was definitely the issue and that is why the video from the GoPro goes out of sync with the audio from the Sony EX. I have managed to fix this in post, which only took me less than an hour to fix, but I think this was a very good problem that needed to happen so in the future I remember to keep an eye on this kind of stuff to prevent more work in post. 

The other thing I learned from the research was where the place characters in the car. Usually when we see a car scene with a family, you will most likely always find the parents in the front seats and the kids in the back. Even if one of the sons is 25, you still see them in the background and that has to do with establishing power and a hierarchy. In our case we didn't have a family, but we did have 4 friends in a car, from which of course one of them was the driver, but it came down to placing the other 3. Although this is more of a directors decision where to place who, I also gave my input based on the research I made. The idea was to put Tom (the driver) and Dean on the front of the car, because them 2 are the ones with a stronger personality among them 4. Dean is the captain of the team, the leader among them and Tom, apart from being the owner of the car and driver, has a also a very strong personality and could be potentially called the second in command. Nathan and Ollie were sent to the back because it fitted their personalities as well and they are more like the people in the middle of the conflict. 

http://www.provideocoalition.com/how-to-shoot-car-videos-inside-out/

Major Project - Advantages of being a Cinematographer and Editor

In this post I want to talk a little but about being a cinematographer and an editor at the same time and the type of advantages that this could bring based on a bit of research and some personal experience. Being a cinematographer and an editor is a very common type of combination for small crews, freelancers and amateurs in general. It can be a very rewarding experience but it can also become a very hard one to control and deal with if you don't know how they can be connected and take advantage of them to make your life and work easier. The most common thing the happens in this case, is that you shoot and you edit, there is no one in between, which already gives you a massive advantage, because as you shoot you can start thinking of how you are going to edit. It doesn't matter the type of production you are doing, wether it is a low budget one or a multi-millionaire one, the collaboration between roles is a fact and what makes you better than anyone else, is the vision you have in order to make other roles easier by making yours.


I started doing a bit of research to see what kind of elements to look for and what kind of things that I have been currently doing in the past, could do better and this is when I came across with some tips and statements from people that are cinematographers and editors at the same time as well. The first thing I did was making sure I understood through research the difference between both roles and even more importantly, their objective and reason of existence:

The cinematographer, also known as the director of photography (D.P.), is responsible for photographing the motion picture and overseeing the camera crew and lighting team. On low-budget films, the D.P. might be the sole person responsible for lighting and may also act as the camera operator. The cinematographer’s primary responsibility occurs during the principal photography stage of production, but they must also spend a great deal of effort during prep and may even oversee the color grading during post production.

The editor, on the other hand, mostly works during post-production by taking the shot footage and making decisions on how to best put the project together. During principal photography, the editor’s main responsibility is to organize the dailies and sync the sound. On larger productions, you’ll have an entire team of people handling picture edit, sound and color grading, but on smaller films, you may have a single person responsible for all of the post-production. The final product is in the hands of the editor.


It seems that these two critical jobs would not overlap. The DP shoots and the editor takes the footage and turns it into a movie. However, the one phase where they should collaborate is pre-production, which Alfred Hitchcock considered to be the most important stage of filmmaking.

Some low budget filmmakers prefer to do one or both of these jobs in addition to directing, as it saves money and resources and is often perceived as preserving the director’s vision. However, it is better to have different people serve as the DP and editor. The DP will carry out the director’s wishes with lighting schemes and angles, but can also offer a second set of eyes to make sure all of the technical aspects of the shots are completed while the director focuses on the overall picture, including talent, art direction, continuity, etc. An editor brings in objectivity to post-production and can “kill the darlings,” cutting shots and scenes that the director can’t bear to part with but need to go for the sake of the film.


Being an editor and a cinematographer helps a lot as well during the pre-production stage, specially the shot list making, because that way you can start visualizing the story from the beginning and not only imagine how you are going to shoot it, but also how are going to cut it and all that can only be possible with the involvement of the editor from the beginning.

The down part about it, is that you as a person become to attached to the movie, being too biased towards a shot because you want it in the edit and also loses one of the most key factors of an editor, which is being a fresh pair of eyes and someone completely unattached to the film. This is probably one of the things I struggled the most when editing and filming, but in the end I managed to get there slowly. 

Editors are storytellers, but from a technical end. They know how the pieces fit together to effectively communicate dramatic and emotional expression to the audience, as well as determining proper pacing of the story. All films will benefit if the editor is involved in the early stages of planning, working with the cinematographer so that both are on the same page about how the director wants the story to unfold visually.


The last point I researched on, was how to correct problems or more likely, avoid, on early stages in order to make the work easier. I found a very useful statement from Danny Greer who is a professional video editor, cinematographer and blogger:

One of the biggest problems facing filmmakers is whether or not the footage they shoot will actually cut well together. A lot rides on this, including consistent performance from the actors and continuity of props, costumes, hair and makeup, actor placement, etc. The director of photography needs to worry about camera placement and gathering appropriate footage that the editor can use.

For instance, the camera crew has to adhere to the 180 degree rule, otherwise editing becomes much more difficult. The D.P. and camera operator should be aware of this, yet mistakes are constantly made that require the editor to “fix it in post.” With the editor’s help in pre-production, shots can be properly planned to avoid these types of situations. While it’s easy for the D.P. to pass off problems to the editor to handle after photography is completed, doing so can create problems that are detrimental to the finished film. You don’t want to have to salvage a scene through clumsy editing. It’s better to have the scene play out naturally without any distracting edits that pull the audience out of the story.

Additionally, an editor can identify other potential editing problems ahead of time and suggest supplementary ideas for coverage. For instance, if the director is planning an extended take, an editor can see opportunities for alternate shots to cut to in case the extended take doesn’t work. The editor can also point out places where insert shots and cutaways can be used for the best effect.

I personally believe that being both is a very tough but amazing experience and this has helped a lot, from shot list to visual effects, working on both can make a lot of things easier.

Major Project - Research into Shooting on a Sunny Day

One of the hardest things for a shoot in general, is depending on weather and this includes the whole package, rain, sun, wind, clouds, snow, etc. A lot of times  you want something like sun, because you need good light on a specific scene, but sometimes too much sun can actually ruin your film so lets stay with Hippocrates quote "everything in excess is opposed to nature." In our case, we had to deal with a couple outside shoots, but there were 2 days from which at least half of the day we were shooting on a football pitch and as a low budget film, really depending on the weather. It was probably the hardest thing I have ever done in my life when it comes down to filming, because as a cinematographer, the slightest change of weather can ruin my shots and even worse give me a lot of work as an editor during the color correcting stage. In order to make sure I knew how to deal with whatever the weather was, I decided to do some research, mainly on sunny days, because we were fine with a cloudy weather, which was going to give the scene a 'shitty' mood, matching was sunday league is all about, but a very sunny day was going to start to ruin everything, because once the sun was out, if a cloud was passing by, it would change my light completely for a couple minutes. In order to confront this properly and make sure I was prepared, I started with the research on sunny days.


The first tip I found was keeping a look at overexposure:

You put sunscreen on because you know exposed skin burns under the midday sun. It's a similar situation for your camera. During the summer months, the sun can be extremely bright, especially at noon. This means you will have to protect your shots from being overexposed by increasing the shutter speed or decreasing the aperture. Both changes reduce the amount of light coming throughout the lens. Don't be surprised if you have to increase your shutter speed up to 1/1000s or even 1/1500s to get the shot you want. This can be perfectly normal in the middle of a very bright day.

In my case overexposure became sometimes a big issue like seen on the picture above, because sometimes the sun wasn't as strong, allowing me and forcing me into changing the aperture to allow more light to come in, otherwise it would look quite dark. The problem with this was that when the sunlight decided to become strong and hard, since my aperture was open, the shots started to become overexposed, making me quickly change back to a lower aperture and different shutter. This was probably one of the hardest task, since we spend over 4-5 hours everyday on the pitch, making me have no break and constantly paying attention to the light and the settings, otherwise there were going to be clips that I wasn't going to be able to use.

The second tip was to avoid noon:

Many subjects look their best when light is shining on them from the sides. That's why sunrise and sunset are the best times to take any photo. In the middle of the day, the sun shines directly overhead and can sometimes cast strong shadows on your subject (usually the face). That's why it's sometimes best to wait an hour or two for the sun to move just slightly across the horizon so you can get a more sideways kind of lighting.

This was actually a very useful tip in a way, because of continuity. I actually couldn't film in what is called the golden hour, which is during sunset and sunrise, because the light naturally changes constantly during those hours of the day. I needed to wait until the sun was finally out and start filming and stop close to sunset, otherwise it would look like another day. This limited us to film between 9-10 and 3 everyday, allowing us a 5 hour slot for filming everything we needed, including giving the actors breaks and such. Sticking to those hours was actually quite helpful because at any point I felt that the sun was starting to become the enemy because of not being where we needed it to be.

The third tip was shoot landscapes:

Sunny days are perfect for landscape and wildlife photography because the closed aperture and very fast shutter speeds you use will prevent the photo from being overexposed. Go out and find an open field, setup an angle that gives the scene a sense of scale, and take the picture at an aperture of F22 or higher. Make sure you use your camera's onboard light meter to help you select the appropriate shutter speed, and don't forget the tripod.

Although we didn't need many landscapes or wildlife for our film, things like establishing shots and drone shots, were very useful at this stage because the sun allowed us to get great views without ruining it in any way. This was actually more helpful to the drone operator, Paul Saunders, rather than me, but in the end it was a very useful tip for the future.

Drone shot 


Another thing I gave a bit of research to, was N/D filters. Although I have used it in another occasions and understand the concept, I realized that it was going to become my best ally in during sunny days or just bright scenes in general. In order to use it correctly, it is important to understand what it is and how it works:

A neutral density (ND) filter is a filter that reduces the amount of light that passes through to the sensor. This means the camera has to perform a longer exposure than usual to create an evenly exposed image, which can be beneficial when you want to be more creative with your photography. You can, for example, use them to reduce light due to an overexposed scene or for more control over the shutter speed for a desired effect such as blurring water.


I also found this table which was quite useful regarding the relation between the N/D filter, the F-stop and the shutter. Knowing that the Sony EX I worked on has an N/D filter that goes from 0 to 2, it was a bit easier to keep an eye on how it worked, specially since I had to be constantly changing my F-stops, N/D filter and shutter due to the changes of natural light:


Overall I think the majority of the shots came out quite good and at least are useful for the edit, but it was a very good experience to work on this type of situation as a cinematographer and understanding how hard it can be to work during sunny days, but most important, how to embrace it and make sure you get the best out of it, because once again, people are counting on you to know this stuff and make the best you can do with what you have. 

I will leave this video here, that although it is meant for photography, it actually helped on dealing with sunlight on peoples faces:


Major Project - Research into Focus (Meaning, Importance, Zoom)


The importance of focus could be easily assumed by saying that an image out of focus doesn't work. This is partially true, depending of course on the type of scene you shooting and the objective of it. Sticking with the obvious and most common which is having your shot properly on focus, there are ways of making sure you are doing it right and avoid making easy mistakes. I decided to do some research on focusing, mainly because I will be zooming and focus quite a lot, plus filming from far away and some up really close, so I need to make sure I understand what to do in which situation to keep control of the focus which can be very easily lost if not knowing exactly what to do. Based on the research I have been doing on focus, I have found out that there are three main aspects about it that will be exploring. The first one is how to properly use focus on the camera in order too keep control of it and make sure that you are truly on focus. The second one is on how focus could change your film for good or bad and how adjusting focus on an image can actually change what the scene is telling you. The last and third one was more of a personal reflection regarding using the zoom and N/D filter while focusing both on internal and external locations, which includes understanding depth of field.


Based on the first point and doing some research on how to focus properly and making sure that I was doing the right thing, I came across with some very interesting information and a very useful video. One of the biggest issues for beginners or people that haven't really shot or have had experienced with a professional camera, is using the focus properly and the tools integrated in the camera in order to help you with it. Some very minor mistakes could dramatically change your shot. Here is a nice video about it:


On this video we can see who the focus on giving some very simple tips and the use of expanded focus, which can become lifesavers and even more important, should become part of the 1, 2, 3 when setting up a camera in any shoot. The expanded focus is great feature that a lot of amateurs are not really aware of or are just not sure how it works and what is is used for. This video explains it quite simple and how to use it, but as a personal experience I believe that is way more than that and will leave here my opinion on it and how this has helped me with my shoot a lot. Expanded focus is used to make sure that your shot is really on focus and not just guide yourself with what you normally see on the camera screen. A lot of the times a shot might seem in focus on the camera but when put on a computer or a TV for example, it might be not. This is usually the main reason why expanded focus is so important, because it literally expands your shot around 10x more than usual, so you can make sure that your object or the eyes of a person are really on focus. The reason why this is useful as well is because usually a lot of the things you see on a small screen can look different on big one and is simply because the resolution of the screen changes meaning the size of your shot does as well. If you are shooting in a 1920x1080 format, you know that that shot up to a 1080p resolution will look good, but it will always still look fine on a small screen because its easier to spot mistakes on a full screen mode on a computer than on the spot on a small camera screen.

I had this issue a couple times when things seemed in focus but after using the expanded focus there were not and this really helped a lot. One thing that happens a lot as well which is what I have learned is probably the most important job of a cinematographer, is to look everything through the camera lens and not just through your eyes. A lot elements change naturally all the time, specially on low budget production, meaning natural light changes, an actor moves an inch or something just changes in your shot and if you are not constantly looking at it, you will most likely not notice. The director can't notice because they are focused on another task, but yours is to make sure that the shoot looks how it's meant to look and if something changes you notify the director because they are trusting you. I had moments when light kept changing, the actors moved a bit just naturally and changed the focus on their faces and all this stuff is something that needs checking every other second because once again, minor stuff might look fine on the small screen, but on the big one it will definitely come up. Sadly one of my biggest issues in the shoot of Sunday League was actually the focus due to vary reasons and this made a lot of my shots soft, which prevented me from using. 


Another thing I came across with during my research, was the importance of focusing. Whether you are focusing on a person, and object or even an animal, changing the focus on something even if its not moving, can give your shot a meaning and a bit of drama to it. I came across with some nice information about this from Tommy Penner, who is an online camera supporter and states:

Shifting focus from a nearby object to a faraway object within the same shot is called “racking focus” and is commonly used to bring the audience’s attention from one subject to another. Professionals and amateurs alike do this by using something called a follow focus, and you can build one yourself to make racking focus much easier!


Here’s a quick example of how racking the focus can add a little bit of drama and tell a story, all within one shot:


As a cinematographer, this was actually a very useful tool and I wanted to put it in practice for our show, but it was hard because we are not really a big drama or action packed one, meaning that  is harder to fit this is. After going through the script over and over I wanted to find a way to include this in and I actually found a small window of opportunity in which I could use it, in a scene towards the end where Don appears in the pitch and no one notices him:

Scene 21, Page 28

"We see a man approaching. Don. He strolls over to the pitch, but isn’t spotted by the team."

I thought at this point it would be a good idea to include this effect which is when I started elaborating it. We would start seeing Ollie tired and hopeless, being the main focus on the camera. As he bends doing showing how tired he really is and almost giving up on everything, he reveals Don behind him, which allowed me to change focus and make give him a big entrance. In order to achieve this, I had to work with N/D filter, which I set to 1 on a scale from 0-2. What this does is reduces the amount of light coming through the camera, but creates a bigger depth of field, allowing me to actually change focus on something based on how depth of field works. Sadly it wasn't a very sunny day, which only allowed me to go to N/D filter 1 instead of 2, but I believe that although the focus could have been better with more light, the objective of it was fulfilled which was to give a bit of drama to his entrance and tell something through focusing and not words. 

Out of focus

In focus

Major Project - Research Into Changing the Light on a Room

For some of the scenes, I had to look into lighting a room properly because in a lot of cases we had situations in which the light kept changing naturally and others where we had no windows and had to create the light from scratch. One of the biggest issues was of course the time limit, since I didn't have hours to create the light, plus everytime we moved or the weather decided to change, this affected the shot instantly. Another issue that I found instantly was the fact that the light could be quite hard on the actors making them uncomfortable, which of course forced me to change things around or make sure that it wasn't affecting their look on camera including acting, face expressions or even getting  fatigue due to the heat.


In order to approach this properly and make the right decision, I decided to look into a couple of articles online and some videos, which talked about a lighting a room and the kind of stuff you should be looking at so you don't waste time. For me some of the most critical ones regarding changing the light of a room, were the ones in which there were no windows or the inside locations that had too many of them, not only giving too much light, but increasing the chances of natural light to change constantly. 

The first tip I got, which was useful in two type of scenes I will talk about, was the difference between a Soft Light and a Hard Light. Dramatic lighting with harsh shadows tells a far different story than flat lighting. Flat lighting takes away the drama and lets the viewer know that there are no dark secrets lurking in the shadows of someone's face.


This of course was quite important, because I wanted to use both types of lighting during the whole shoot. The soft one was going to become the most common one, since our genre is not mystery, action or big drama, but I also wanted to include some of the hard light ones across the video, in some scenes that were either dramatic or had a bit of mystery or hidden elements behind it. The first example of using the hard light was during the wedding scene, in which Dean and Ollie follow Don to a small backroom to have a chat regarding them wanting him to join the team as their coach. Originally that small room and the main room where the wedding was happening, had a very similar light, which in my opinion didn't fit, because I wanted to show that we were in different rooms and more important was giving a mood to the small room. During our test shoots this is how they looked with the standard lights

Main room 

Small room 

In order to fix this, I looked into getting rid of the lights on that small room, which of course left me with a pitch dark room since there are no windows there and the door had to remain closed. I used  a tonsil light to make this look a bit more dark but still with some light. Since the lights are yellow, of course the room was starting to get a very similar tone to the normal lightbulbs that were in that room (see image below), but at this point I decided to take on board the second tip I found which was to change the color temperature on the camera, based on the light as I wanted to give it a different look.

Incandescent bulbs are 2700K. That's warm.

Office fluorescents are around 4200K. That's a bit cooler.

Daylight is 5600K. That's cool.

Never shoot with auto white balance on your camera.

Match the color temperature of the scene you're shooting in as closely as possible.

Before Changing Camera Settings

The ideal thing was to edit the white balance from the Profile Picture setting in order to reduce the about of Kelvin to make it a bit more blue without making it look too blue. This tip helped me because it showed me how if you have a strong light and you change the color in the camera directly, you can achieve some very nice and unique tones and you probably couldn't without going through all the trouble. 

This is how the picture looked like in the end with the same light from above but a lower Kelvin in the whites:


The idea was to still keep a couple shadows on the actors and also on the room itself, to give it a bit of a drama mood to match it with the situation and what is happening on the scene.

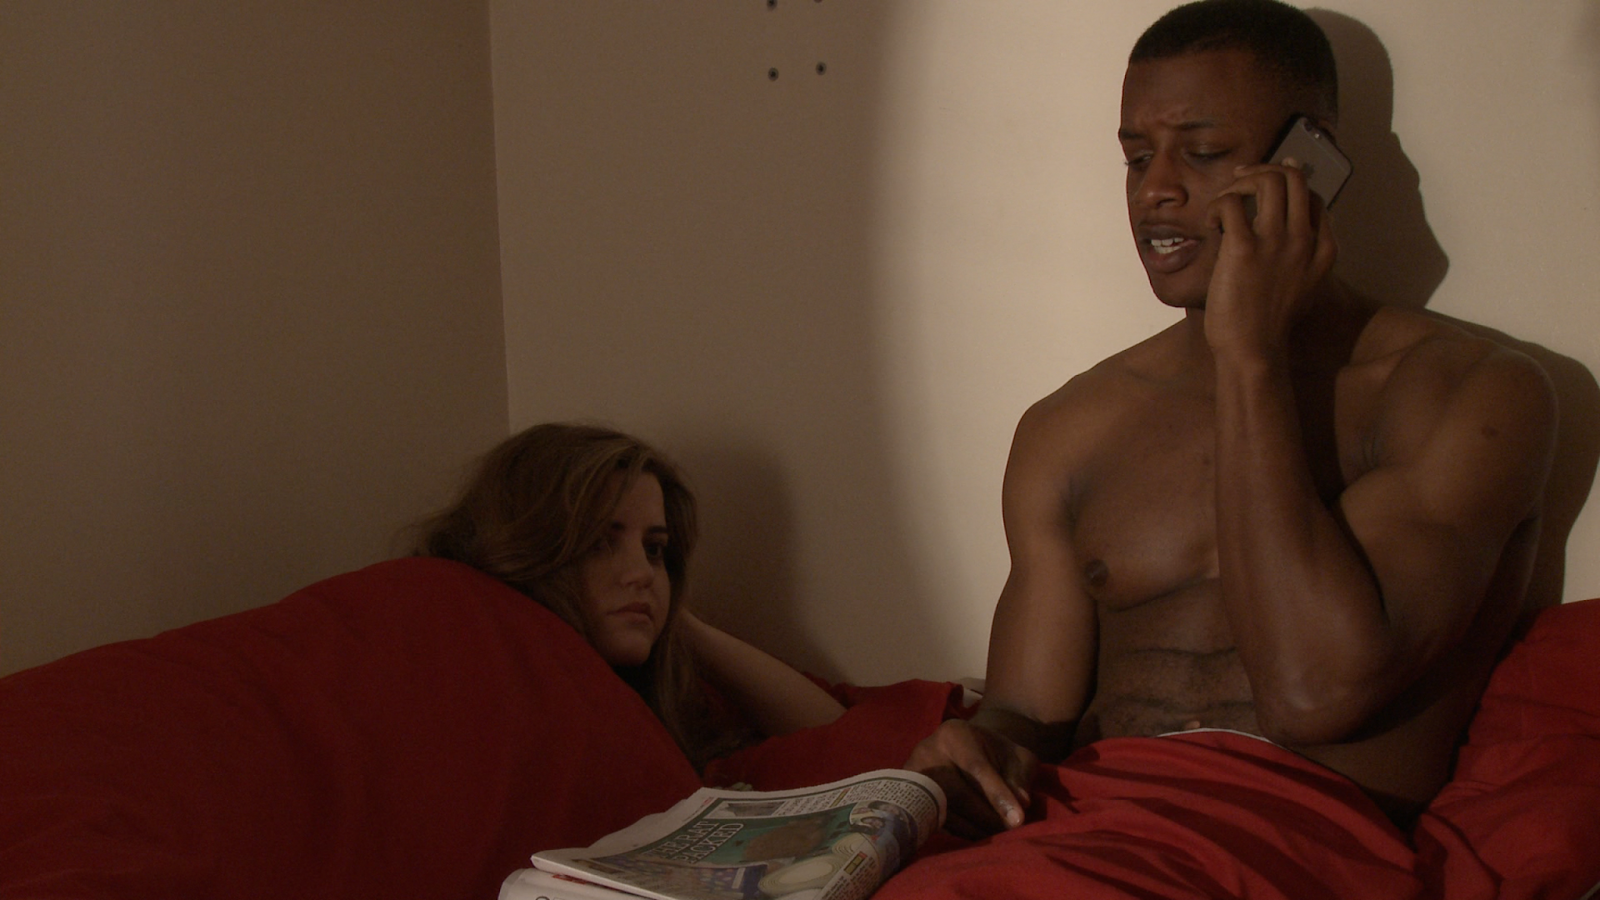
Another scene in which I had to use a lot of these tips for changing the light on a room, was the bed scene in which Dean sleeps with 2 different girls. The problem was that I had to create a light that made it look like a bit early in the morning but that also light him up properly due to his dark color skin (I will be posting more in detail about my research on lighting a dark skin person). For this I also wanted to create a hard light in which you could see a bit of a shadow of him, to give both the scenes a mood saying "something has happened here, this guy is a legend" that way I could give it a bit of drama and establish that something was going on here. For this I used one tonsil light as well, along with a bit of natural light from the window to help me light him up a bit on his other side of the face but also the room as well. I couldn't use another tonsil because first the room was too small meaning it was going to become too bright and second I didn't want his other side of the face to be too lighted up. 


This is how it looked like in the end for both scenes:


Lighting is not simple but at the same time it is not realistic. None of the light you see on camera is actually real compare to what you see with your eyes and I found this fact that actually helped a lot to understand how to light properly and actually focus on how the scene looks like rather on making it look really realistic 

"Video lighting isn't realistic. The lighting we're used to seeing in films and network video isn't usually true to life. In fact, it's often very unnatural. In most cases, it's an improvement on reality for the benefit of the camera. Where does the light come from in the night scenes? "Realistic" would be to shoot in darkness, but you might as well leave the lens cap on. How about those network interviews? In many cases, "realistic" would be to shoot using ugly overhead fluorescent lighting-just like in your classroom. A video professional would never shoot under those conditions. Instead, they use flattering, portrait-like soft light for the subject with a nice little accent in the background. When you see an expert interviewed in his office on network TV, that's not how the office is normally lit."

http://www.techlearning.com/news/0002/light-right--a-crash-course-in-lighting-video/55734